We are sure that you have heard about Microsoft Office at least one time before. It’s an application bundle from Microsoft, which includes helpful apps such as Word, Excel, PowerPoint, OneNote, Access, Outlook, and Publisher.
In this application package, Microsoft Word, Microsoft Excel, Microsoft PowerPoint and Microsoft Outlook are the most used apps. These programs will assist you to do your work faster, better and more efficiently, Microsoft Excel in particular.
In this article, we will cover the top five Excel tips and tricks that you must know to work with this spreadsheet application better.
Top 5 Microsoft Excel Tips And Tricks You Must Know
Microsoft Excel is the most popular spreadsheet program for both Windows and Mac OS. This application allows users to create and manage a spreadsheet, as well as organize, format, and analyze its data.
Whether you are a business owner, an accountant, or just a regular user, Microsoft Excel will make your work quite easier, and undoubtedly more efficient.
Let’s take a look at those handy Excel tips and tricks.
#1. Adjust Row Height Or Column Width Of Excel Spreadsheet
When creating a new Excel spreadsheet, it will have the default size. However, if you are working with data that is a size smaller or larger than the default size of the worksheet, then it’s time to adjust those dimensions.
To set the row height or column width of your spreadsheet, go to the “Home” tab, choose the “Format” option from the “Cells” group.
Subsequently, select the “Row Height” or “Column Width” option to resize the dimension of the row or column of your worksheet.

Besides, you can also use your mouse to resize rows and column manually. To do so, move your cursor to the position between two rows or column (the line). Then press down and hold the left button of your mouse and move to adjust the size to smaller or larger, depending on the size you need. After that, release the button!
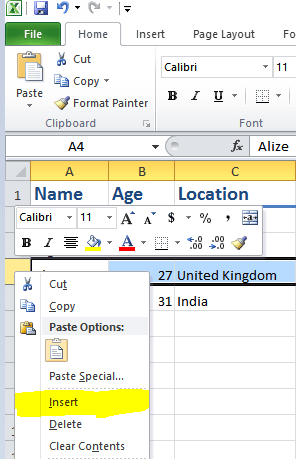
#2. Add Or Remove A Specific Row Or Column
Do you know how to insert a new row or column in an Excel worksheet, especially between two rows or columns?
Well! It’s quite simple! All you need to do is to select a particular row or column by clicking on the header of it, then right-click and choose the “Insert” option. A new row or column will be added, depending on what you have selected.
Similarly, you can remove a specific row or column by right-clicking on the header of it and choose the “Delete” option.
#3. Use Excel Functions To Speed Up Your Task
The real power of Excel is not about how we can create, manage or customize a spreadsheet, it’s about the built-in functions and formulas.
There are more than 450+ Excel functions that you can use to do basic calculations as well as advanced data analysis.
If you work with Microsoft Excel a lot, knowing your way with formulas would really help you get a lot of work done faster and more efficiently.
Here are some of the commonly used Excel functions:
- Sum: It allows users to calculate the total value of requested cells, or even a row or column.
- Average: This function makes it possible to calculate the average value of requested cells or a range of cells. It can be used to calculate the average value of a row or a column.
- Max: Gets the maximum value of specific cells.
- Min: Helps us to calculate the minimum value of particular cells.
- Count: This function is used to get the number of entries in a range of cells. It can avoid cells without numeric data or empty cells.
Besides the simple functions, there are many advanced functions (such as VLOOKUP, SUMIF, COUNTIF, and INDEX function) that can be useful while doing advanced calculations and data analysis.
To find out more about Excel functions, as well as add them to your worksheet, go to the Formulas tab.
#4. Customize The Style Of A Specific Row, Column, Or A Cell
If you want to change the style of a particular row, column or even a cell, you just need to use predefined styles from the Style group in the Home tab.
There are many predefined styles you can choose to customize or highlight your row, column or cell. In case you don’t like all the preset styles, you can create a new style and customize all values.
Doing this simple change can drastically increase the readability of your report and make it look more professional.
#5. Create A Chart From Your Data
An outstanding feature of Excel is that users can create a chart based on selected data, which allows us to display data visually.
To create a chart, you just need to select the range of data you want to include. Then go to the Insert tab and select the type of chart you want to insert from the Chart group. A new chart will be added to your Excel spreadsheet.
Subsequently, double-click on the chart to change its settings, or on each piece to add a label and adjust its value and settings.
Excel offers a variety of chart types that enable you to present it visually and tell a story from the data.
Some of the chart types include bar chart, column chart, line chart, pie charts, scatter plot, and waterfall chart (in Excel 2016).
We hope these Excel tips will help you to work with your worksheet better and faster. If you have any questions, feel free to leave a comment below.